
For the home or the small office environment, connecting computers and resources like printers in a client-sever network configuration might be a little more hassle than you want to deal with. A "peer-to-peer", or "workgroup" configuration, might provide all the security and functionality you need with less expense and less expertise to administrator.
One downside to the "peer-to-peer" configuration is that the performance of a computer may degrade while another computer is accessing its shared resources, and of course, to access resources on another computer, Windows must be started on the other computer, which may require someone to login.
A peer-to-peer network configuration requires that each computer have a network adapter circuit and a cable to connect to a hub. A hub serves as central distribution point for a network. If you're connecting only two computers, you don't need a hub, you can use a cross-over cable instead.

Installing a network adapter card
Almost all modern motherboards have a built-in network circuit. If you have an older computer, you can install a network adapter card.
- Turn off and unplug the computer.
- Remove the cover from the computer.
- Remove a blank expansion slot cover next to an available PCI slot from the back of the chassis.
- Plug the network adapter card into the PCI expansion slot connector.
- Fasten the adapter card to the rear of the computer by tightening the screw.
- Close the computer cover.
- Connect a network cable from the adapter card to network hub or switch.
- Start the computer.

When Windows Plug-and-Play (PnP) detects a network adapter circuit, it creates a Local Area Connection (LAN) in the Network and Dial-up Connections folder, and installs the required networking protocols. You may need to insert Windows OS disc or the disc that came with your motherboard or network adapter card to access the drivers.
Once you've installed the network hardware, you need to install and configure the network protocols and services.
To make sure the required network protocols and services are installed.
- login as Administrator.
- Select Start | Settings | Network and Dial-up Connections.
- Right-click on "Local Area Connection".
•If no "Local Area Connection" appears, make sure the network adapter circuit driver is installed. Select Start | Settings | Control Panel and open the System Properties utility. On the Hardware tab, click on the [Device Manager] button, and open the Network adapters branch. Right-click on the name of your network adapter circuit and select Properties in the popup menu that appears. You may need to insert Windows OS disc or the disc that came with your motherboard or network adapter card to access the drivers.

- Select "Properties" in the popup menu that appears.
- In the "Local Area Connection Properties" dialog box, make sure the following are installed:
- Client for Microsoft Networks
- File and Printer Sharing for Microsoft Networks
- Internet Protocol (TCP/IP)
In order for computers on a network to contact each other, each must have a unique IP Address. If a computer is configured to obtain an IP address automatically, it will use Automatic Private IP Addressing (APIPA) to generate its own IP Address. If the generated address has already been used by another computer, it generates another IP address.
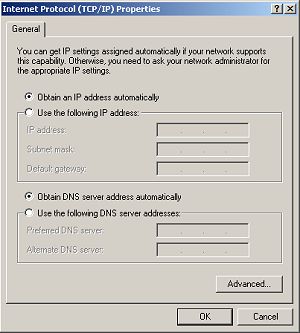
To make sure your computer is configured to use APIPA.
- Login as Administrator .
- Select Start | Settings and right-click on Local Area Connection.
- Select Properties in the popup menu.
- In the "Components" List, highlight "Internet Protocol (TCI/IP)".
- Click on the [Properties] button.
- In the Internet Protocol (TCP/IP) Properties dialog box, make sure the radio buttons next to "Obtain an IP address automatically" and "Obtain DNS server address automatically" are set.
To access a resource on another computer over the network, the resource on the other computer must be shared. A user can choose to share any resource to which they have the rights to share. You can also login to a workstation as Administrator and share a resource.
To share a folder on a workstation.
- Login as Administrator.
- Right-click on the folder that you want to share.
- Select "Sharing..." in the popup menu that appears.
- In the Properties dialog box that appears, select the Sharing tab.
- Set the "Share this folder" radio button, then click on the [Apply] button.
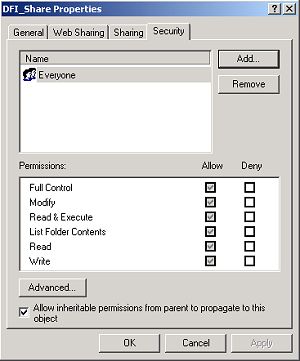
- Select the Security tab.
- Add the "Everyone" group and set the access rights for that group, then click on the [Add] button.
- Click on the [OK] button.
To access a shared resource.

To access a resource on another computer over the network, open My Network Places and select "Computers Near Me". Click on the name of the computer and then on the name of the folder. Accessing a shared resource on another computer in Windows Explorer is just like accessing a resource on your own computer, except You may be required to login the first time you access the resource.

More Windows Tips:
• Put a Help and Support Center Shortcut on Your Desktop
• My Favorite Windows 7 Tips and Tricks
• How to Restore Files from File History in Windows 10
• Save Ink When Printing
• Change Internet Explorer's Default Search Engine
• Desktop Shortcuts Give Quick Access to Applications and Folders
• Associating File Types
• Delete Windows App Usage History
• Make the Insertion Point Cursor More Visible
• Vista - Restore Deleted Recycle Bin