
In case you are not familair with SVG, SVG stands for "Scaleable Vector Graphics". There are two basic forms of computer graphics, bitmap and vector. A bitmap is an array of data that provides information about each pixel on the computer screen. Bitmap graphics is created using a "paint" program. It is very difficult to edit an image in a paint program. When you resize a bitmap to enlarge it, the image gets blurry.
Vector graphics is data that provides the coordinate locations of points or nodes on lines that define the image of an object. Vector graphics can be created and edited using a vector graphics drawing application. The image is edited by changing the coordinate locations in the image data. "Scaleable" means that the image can be resized over a wide range without loss of quality. Bitmap graphics is still used for things like photographs, but for graphic artists, vector graphics is the best way to go.
I've used Inkscape for several years. It's an amazing application. One drawback with Inkscape is that it must be downloaded and installed either on Windows or on Linux. The trend nowadays is to use online applications.
Draw SVG is a free SVG drawing tool licensed under LGPL-3.0. Its code is written in HTML5, CSS, and Node.js, so it is fully web browser compatible. The code is available on github and may be downloaded to run on your desktop or may be integrated into your website. An online working application is available at DrawSVG.
The Draw SVG interface is much different from Inkscape. Which interface is better is debatable, but knowing how to use Inkscape will only be slightly helpful in figuring out how to use Draw SVG
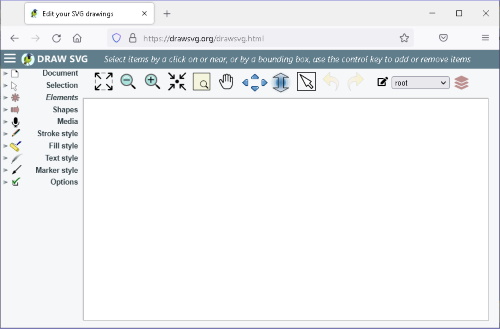
As an introduction to Draw SVG, browse over to the online application. The application works on Windows, Linux, and Android Tablets. In the instructions below I instruct to use the mouse to click and drag. If you have a touch screen you can tap and drag. Lets start with drawing a basic straight line.
Draw a Straight Line
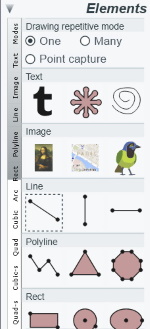
1. On the left side of the application's window, open the "Elements" menu. In the Elements menu, click on one of the lines. Note that icon becomes framed by a dotted rectangle to indicate that it is activated.
2. Move the mouse pointer to a location in the drawing area where you want to begin the line and press the left mouse button. Move the mouse pointer to a location in the drawing area where you want to end the line and press the left mouse button.
3. If you click on the line, a small circle appears on each end of the line. You can place the mouse pointer over one of the small circles, press the mouse button, and move that end of the line.
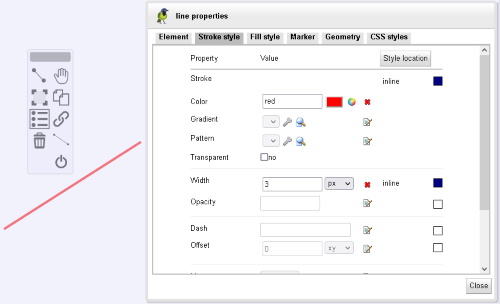
4. Note that when the line is selected, a popup menu appears. In the popup menu, click on the properties icon (3 dots and 3 dashes). In the "line properties" dialog box that appears, select the [Stroke style] tab. on the [Stroke style] tab, click on the color box, a color palette appears from which you may choose a color. Further down in the dialog box you will see the "Width" entry box. Enter a bigger width size in the box.
5 Click on the [Fill style] tab. On the [Fill style] tab you can choose a fill color. Note there are many other properties you can choose, but this is only an introduction.
Draw a Rectangle
1. Open the "Elements" menu.
2. Note that the Elements menu has a scrollbar on its left side. Scroll down until the "Rect" menu is is visible. In the "Rect" menu, click on the rectangle icon. Note that icon becomes framed by a dotted rectangle to indicate that it is activated.
3. Move the mouse pointer to a location in the drawing area where you want one side of the rectangle. Move the mouse pointer to a location in the drawing area where you want the other side of the rectangle and press the left mouse button. The rectangle will appear.
4. If you click on the rectangle, a small circle appears on the upper-left and lower-right corners of the rectangle. You can place the mouse pointer over one of the small circles, press the mouse button, and adjust the size or position of the rectangle.
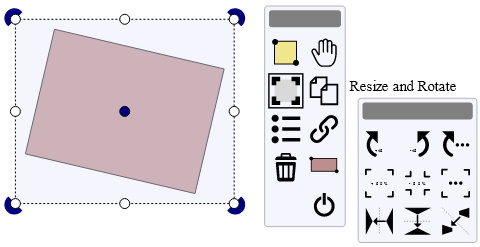
5. Note that when the rectanle is selected, a popup menu appears. In the popup menu, click on the "Resize and Rotate" icon (Box with four corners marked). The rectangle will be framed by a dotted line with eight small round circles. These small round circles, sometimes called "handles", can be used to resize the rectangle. The four corner handles can be used to rotate the rectangle.
6. In the popup menu, click on the properties icon. In the "rectangle properties" dialog box that appears, select the [Stroke style] tab. on the [Stroke style] tab, click on the color box, a color palette appears from which you may choose a color. Further down in the dialog box you will see the "Width" entry box. Enter a bigger width size in the box.
Draw a Circle
1. Open the "Elements" menu.
2. Scroll down the Elements menu until the "Rect" menu is is visible. In the "Rect" menu, click on the Circle icon. Note that icon becomes framed by a dotted rectangle to indicate that it is activated.
3. Move the mouse pointer to a location in the drawing area where you want the center of the circle. Move the mouse pointer to a location in the drawing area where you want the circumference of the circle and press the left mouse button. The circle will appear.
4. If you click on the circle, a small circle appears at the center and another small circle appears at the lower right along the circumference of the circle. You can place the mouse pointer over one of the small circles, press the mouse button, and adjust the position or diameter the circle.
5. Note that when the circle is selected, a popup menu appears. In the "circle properties" dialog box that appears, you can set the color and the width of the circumference of the circle.
Draw an Ellipse
1. Drawing an ellipse is very similar to drawing a circle or a rectangle. Scroll down the "Elements" menu until the "Rect" menu is is visible. In the "Rect" menu, click on the "Ellipse" icon.
2. Move the mouse pointer to a location in the drawing area where you want the center of the ellipse. Move the mouse pointer to a location in the drawing area where you want the circumference of the ellipse and press the left mouse button. The ellipse will appear.
3. If you click on the ellipse, a small circle appears at the center and another small circle appears at the lower right along the circumference of the ellipse. You can place the mouse pointer over one of the small circles, press the mouse button, and adjust the position or dimensions of the ellipse.
4. In the popup menu that appears when the ellipse is selected, click on the "Resize and Rotate" icon. Similar to a rectangle, handles can be used to resize the ellipse and the four corner handles can be used to rotate the ellipse.
5. Similar to the other elements, in the "ellipse properties" dialog box, you can set the color and the width of the circumference of the ellipse.
Saving Your File
To save your work, in the left side menu, open the "Document" menu. Select the "Save" icon. The "Save SVG document" dialog box appears. At the bottom of the dialog box, click on the [Save as File] button. In the "Opening drawing.svg" dialog box that appears, click on the "o Save File" radio button. Then click on the [OK] button.
Many applications claim to be "SVG" drawing programs, but they will not actually save files in SVG format. They save your file in some proprietary format that is not usable on the Web. Draw SVG saves files in actual SVG format. The saved file is not formatted, it's just a long string of xml elements. It, however, is not too difficult to format the code.
To embed your drawing in a webpage, use the <object> element as shown below.
<object type="image/svg+xml">
Paste code from saved file here.
</object>
Conclusion
One of my goals is to teach people how to draw. Paper and pencil is still a good way to go, however drawings would need to be scanned (or photographed) to post them on the Web. A drawing created on a computer can be posted directly on the Web. Drawing on a computer with a vector drawing program is the best way to go. I have been showing people how to do this with Inkscape, but many people do not want to download and install a large application to their computer. They want to use a web based application with their tablet. Draw SVG seems to meet the need. This article has touched on only a tiny part of what Draw SVG can do. I will be exploring Draw SVG in many more articles.

More Graphics Design Tips:
• Paint.Net Ink Sketch, Oil Painting, and Pencil Sketch Artistic Effects
• Krita Paint plus Vector Drawing Portable Application
• How to Install the Free, Open-Source, Blender 3D Animation Application
• Tips and Tricks for Getting Free Images
• SVG Example Code to Rotate Elements
• Drawing Text with Draw SVG
• RGB Vs CMYK
• Inkscape Grouping
• Free Animated GIF Maker
• SVG Basic Shapes Tutorials