Inkscape Circles, Ellipses, and Arcs Drawing Tutorial
By Stephen Bucaro

Inkscape is a free vector drawing application. This article gives you the basic methods of creating
and controling the size and shape of circles, ellipses, and arcs. The ellipse tool allows you to draw
circles, ellipses, and arcs. Click on the ellipse tool in the toolbox.

In the Inkscape drawing area, press and hold the left mouse button while dragging the mouse pointer.
Release the left mouse button to complete the ellipse. The ellipse should be remain selected after
you release the left mouse button, causing the ellipse to be enclosed in a rectangle. The rectangle
will have 2 small square handles and 1 small circle handle.

In Inkscape an object must be selected to have handles. If the object is not selected, click
on the Edit paths by nodes tool, and then click anywhere on the ellipse. When the
Edit paths by nodes tool is selected, The mouse pointer will become a thin arrow. With the
tip of the arrow on one of the small square handles, press and hold the left mouse button while
dragging the handle. Release the mouse button.
One of the small square handles is used to adjust the width of the ellipse. The other small
square handle is used to adjust the height of the ellipse. The small circle handle can be
used to create an arc.
In reality the small circle handle is two small circle handles exactly on top of one another.
To create an arc drag one of the small circle handles off the top of the other one. Now this is
tricky:

If you click on a small circle handle, and while holding down the mouse button, move the
mouse pointer slightly outside the curve while dragging, the arc will be a closed wedge with
sides that extend to the center of the ellipse.

If you click on a small circle handle, and while holding down the mouse button, move the
mouse pointer slightly inside the curve while dragging, the arc will be an an open arc, with
no visible sides.
If you inadvertently drag a small circle handle, causing the arc sides to appear, it's a
little tricky to get rid of them, I find you have to zoom in close and place the arc handles
exactly on top of each other.

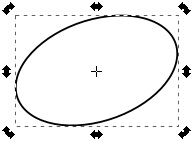
You can do quite a bit of ellipse shaping with the Select and transform objects tool.
Select the Select and transform objects tool in the toolbox and then click on the
ellipse. Eight double-arrow handles will appear. You can drag one of those handles to change
the size of the ellipse.

If you click on the edge of the ellipse, the four corner double-arrow handles of the ellipse
container box will change into rotation handles. Click on one of the rotation handles, and while
holding down the mouse button, drag the handle. This way you can rotate the ellipse.
Of course there are many more things you can do with circles, ellipses, and arcs. But this
gives you the basic method of creating and control their size and shape.
More Graphics Design Tips:
• Image Processing Filters - How to Sharpen a Photograph
• HTML5 Canvas
• How to Make a Video Game for your Xbox for Free
• Image Scanning - Confused About DPI?
• MathML Elements to Display Subscripts and Superscripts
• Inkscpe Snap Controls Bar
• How to Remove PNG and JPEG EXIF Metadata
• Graphics Design for Beginners - Blur Filters
• Inkscape Exercise: Draw Photorealistic Sphere
• MathML Element to Display a Radical
| 
