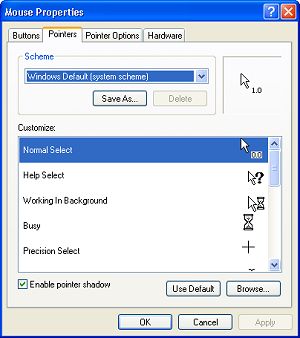
Have you ever looked up at the computer screen and said "where the heck is the mouse pointer?" Sometimes the default mouse pointer is difficult to locate on the screen. You can change and add effects to the mouse pointer that will make it easier to find on the screen. To change the mouse pointer, open the Control Panel Mouse Properties utility.

Select Start > Settings > Control Panel. In Control Panel, open the Mouse Properties utility and select the Pointers tab. The Customize: list displays a list of mouse pointer modes. Make sure the mode that you want is highlighted, i.e. "Normal Select", then click on the [Browse...] button. By default the Browse dialog box will display the cursors located in the Windows/Cursors folder.
Files with the .cur extension are static cursors, files with the .ani extension are animated cursors. Any type of movement will make the mouse pointer easier to find, so choose an animated cursor. For example "counter.ani" displays a little counter next to the mouse pointer. After you have chosen a cursor, click on the [Open] button.
• You don't want to get too wild with changing the pointers for many mouse pointer modes because the shape of the pointer tells what mode the mouse is in, i.e. resizing, moving, etc. Without this cue, your work could get more confusing.
While you're on the Pointer page of the Mouse Properties utility, check the Enable pointer shadow check box. Adding a shadow to the mouse pointer should also make it easier to find on the screen. Then select the Pointer Options tab, and check the Display pointer tails check box. This causes an interesting effect that really enhances the mouse pointer's visibility while it's in motion.
When you finished configuring your mouse pointer, click on the [Apply] button, then click on the [OK] button.
Note - Configuring the mouse pointer with these extra effects can cause your system's performance to slow slightly. After ten minutes or so, you may find the effects to be too much of a distraction. No problem, open the Mouse Properties Pointers tab again and click on the [Use Default] button ([Apply][OK]). You’re back the original mouse pointer.
More Windows Tips:
• OpenOffice a Software Solution to Enhance your Office Productivity at No Cost
• Why My Office Files Do Not Open
• Change Your PC's Name
• How to Connect Two Computers
• Create Your Own Custom Taskbar Toolbar
• Configure the Start Menu
• VLC Free Open-Source Media Player
• What is Airplane Mode?
• How to Add or Remove Items from Send to Menu
• Most Useful Keyboard Shortcuts

